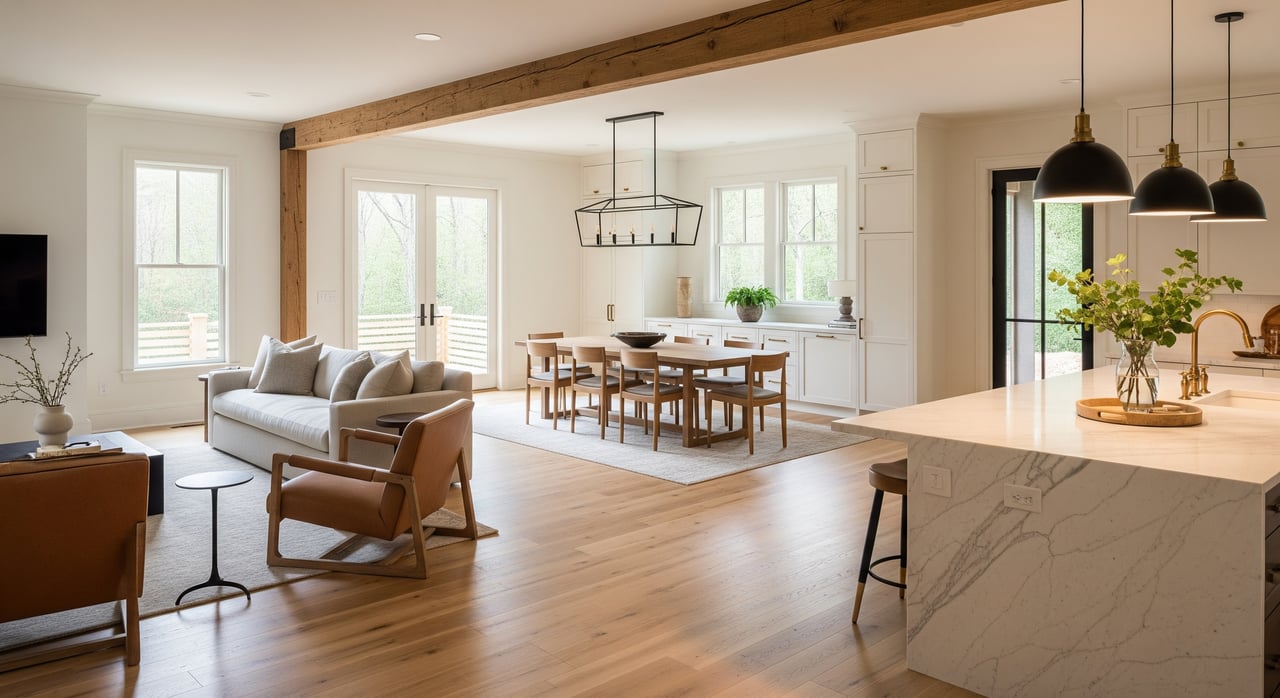
Is your open living, dining, and kitchen space not reading the way you want in photos or showings? You’re not alone. Open floor plans are popular in Woodstock, but they can feel undefined without a clear plan. In this guide, you’ll learn simple, high‑impact staging moves that improve flow, show function, and help buyers picture everyday life in your home. Let’s dive in.
Why open‑plan staging matters in Woodstock
Many single‑family homes in Woodstock were built or remodeled since the 1990s with open layouts. Buyers here tend to value light, sightlines, and flexible living spaces they can use for entertaining, family time, and work. They also pay close attention to usable outdoor space and overall functionality.
Open plans can look spacious yet feel confusing if zones are not defined. Staging solves that by showing where to relax, eat, work, and play. When zones are clear, your rooms look larger, photos read better, and buyers spend more time imagining themselves in the space.
Create zones buyers understand
Clear zoning tells buyers how the space works without adding walls. Use these tactics to define areas while keeping the plan open and airy.
Use rugs to anchor each area
- Choose a living room rug large enough for the front legs of your sofa and chairs to sit on it.
- For dining, select a rug that extends about 24 inches beyond chair edges so chairs stay on the rug when pulled back.
- Keep patterns simple and colors coordinated with the overall palette.
Float furniture to shape conversation
- Pull seating off the walls to create a conversation cluster around a coffee table or fireplace.
- Place a slim console table or narrow shelving behind a sofa to suggest a boundary between living and dining.
- Align primary pieces so you preserve sightlines to the kitchen island and windows.
Keep walkways obvious and open
- Maintain roughly 30 to 36 inches for main walkways between zones.
- Use 24 to 30 inches for secondary paths where less traffic is expected.
- Avoid blocking windows or sliding doors so the eye travels to your yard or deck.
Show a useful flex spot
- If there is no separate office, stage a small work nook with a compact desk and task lamp.
- Consider a reading corner or children’s play area if it fits naturally into the plan.
- Keep accessories minimal so the area reads as flexible rather than cluttered.
Right‑size furniture and placement
Furniture scale can make or break an open plan. The goal is to fit the room, not overpower it, and to leave comfortable circulation.
Measure before you move or rent
- Note room dimensions, doorways, and distances between focal points.
- Check ceiling height to match the visual weight of furniture and fixtures.
- Use painter’s tape on the floor to test layouts before lifting heavy pieces.
Follow simple spacing rules
- Conversation seating works well when pieces are about 8 to 12 feet apart in a typical living room.
- Keep the coffee table 12 to 18 inches from the sofa edge for easy reach.
- Allow 30 to 36 inches for main traffic lanes so movement feels natural.
Edit for clarity
- Less is more in open spaces. Remove extra chairs, side tables, or bulky shelving that fragments the room.
- Prioritize one main seating group and one dining setup. Add only what supports those zones.
- If a dining area is tight, a round or pedestal table can improve flow.
Balance visual weight
- Pair a substantial sofa with lighter tables or open shelving across from it.
- In family zones, choose lower‑profile seating to keep sightlines open.
- Keep tall pieces against walls so the center of the space feels clear.
Use color for flow and subtle contrast
Color helps your home feel calm and connected while still highlighting the purpose of each area.
Choose one neutral base
- Paint connected spaces a single neutral color to avoid visual breaks.
- Keep undertones consistent. Warm neutrals pair well with Georgia’s natural light, but pick what suits your finishes and floors.
- Keep trim the same tone throughout adjoining rooms for a unified look.
Repeat accent colors intentionally
- Use pillows, throws, art, and table decor to introduce one or two accent colors.
- Repeat those colors across zones, such as a blue pillow in the living area and a similar blue on dining chair cushions.
- If you use an accent wall, keep it subtle and complementary.
Lift the ceiling and define details
- A slightly lighter color on the ceiling can make rooms feel taller.
- Keep door and window trim consistent to help the eye move smoothly through the plan.
Light every zone for photos and showings
Lighting guides buyers through your home and improves every photo.
Layer ambient, task, and accent light
- Ambient: ceiling fixtures or recessed lights for overall brightness.
- Task: pendants over the island, a desk lamp in the work nook, a floor lamp by the reading chair.
- Accent: wall sconces, art lights, and table lamps to add depth and highlight features.
Make daylight do the work
- Clean windows and use simple window treatments that allow light to flow across connected spaces.
- Place mirrors to reflect natural light deeper into the room.
Match bulb temperature and quality
- Use one color temperature throughout the main areas. Warm white around 2700 to 3000K creates a welcoming feel.
- Choose bulbs with a high color rendering index so finishes and fabrics look accurate in person and online.
Right‑size fixtures
- Scale a dining pendant to the table and room size. In small to medium rooms, a fixture about 30 to 36 inches wide often works well.
- Space island pendants evenly so work areas are well lit without glare.
Support the story: clutter, storage, and outdoor flow
Open layouts show everything at once, so keep surfaces clean and purposeful.
- Declutter counters, open shelving, and media consoles. Limit accessories to a few grouped items.
- Hide small electronics, cords, and personal photos so buyers can imagine their own setup.
- Style the deck or patio that is visible from the main living area. Add a simple seating set to extend the living zone outside. Keep door thresholds clear to suggest easy indoor‑outdoor living.
Seasonal staging cues in Cherokee County
- Spring and summer: lean into outdoor living. Freshen landscaping, set an inviting table on the deck, and make sure the grill area is tidy.
- Fall and winter: layer cozy textiles, ensure all bulbs match in color temperature, and add warm, even lighting in corners that can look dark in photos.
- Year‑round: keep a consistent palette across zones so virtual tours feel seamless and easy to follow.
Budget, options, and when to hire help
Professional staging can be as simple as a consultation or as comprehensive as full furniture rental.
- Consultation only: a stager walks the home and gives you a room‑by‑room plan you can implement.
- Partial staging: focus on high‑impact spaces such as the living area, kitchen, and primary bedroom.
- Full staging: complete furniture and styling throughout the home, often ideal for vacant listings.
Costs vary by scope and market. The right package depends on your home’s condition and price point. Many Woodstock sellers find that targeted staging in main living areas is enough to clarify flow and elevate the listing.
If you prefer a guided, turnkey approach, our team offers complimentary professional staging guidance and photography as part of a full‑service listing plan. That way, you get consistent design choices, polished visuals, and a faster prep timeline without the guesswork.
Quick open‑plan staging checklist
- Measure rooms and map the layout before moving or renting furniture.
- Paint connected spaces one neutral color and keep trim consistent.
- Choose rugs that anchor each zone and fit under furniture correctly.
- Float seating to form a conversation area and maintain 30 to 36 inch walkways.
- Use slim consoles or low shelving to suggest boundaries without blocking views.
- Layer ambient, task, and accent lighting with matching color temperature.
- Declutter surfaces and hide cords, chargers, and personal items.
- Add a compact work nook if there is no dedicated office.
- Style the most visible outdoor area as an extension of the living space.
- Review rooms through a camera lens to confirm that flow reads in photos.
A few smart layout and lighting decisions can transform how buyers experience your open floor plan. With clear zones, right‑sized furniture, and a cohesive palette, your home will photograph beautifully and feel move‑in ready during showings. If you would like expert eyes on your layout and a tailored plan for your timeline, connect with Lee Ann Sherry for a complimentary market valuation and staging consultation.
FAQs
What is the best way to start staging an open floor plan in Woodstock?
- Begin by measuring each zone, selecting a single neutral wall color, and editing furniture to one main seating group and one dining setup.
How can I define rooms without using walls in my open concept?
- Use area rugs to anchor zones, float furniture to shape conversation, and add slim consoles or open shelving to suggest boundaries while keeping sightlines.
What size rug should I use under a dining table in an open layout?
- Choose a rug that extends about 24 inches beyond the chair edges so chairs remain on the rug when pulled out.
How wide should walkways be between zones for showings?
- Keep primary paths around 30 to 36 inches wide and secondary paths 24 to 30 inches to support easy circulation.
What color temperature bulbs are best for open living areas?
- Use warm white bulbs around 2700 to 3000K throughout connected spaces so the light feels consistent and welcoming in person and in photos.
How do I stage a kitchen island in an open plan?
- Keep the surface mostly clear, add two or three coordinated stools to show casual dining, and check that pendants are scaled and spaced for even task lighting.
Is professional staging worth it for a Woodstock open concept home?
- Many sellers see stronger presentation and buyer response when zones are clear and styling is cohesive; a consult or partial staging can deliver outsized impact in main living areas.